


Please note that we do not create all the designs featured in this article. Our primary focus is to curate and collect a diverse range of design collections and products to inspire and share with our audience. While we do not claim ownership or take full credit for the original designs and images, we occasionally make minor adjustments, particularly in home decor and fashion items, to present them more effectively. Additionally, we may produce and edit images to enhance their quality and composition before sharing them on our Pinterest page or website. For the design work we do on these creative designs, we also include our logo on the images shared on Pinterest and our website. This helps our audience recognize that these designs have been published on insiderlyfe.com!
What if your best Thanksgiving accessory cost less than a pumpkin pie?
A bottle of polish, a few stickers and one cozy evening at the kitchen table are honestly all it takes.
Thanksgiving 2026 falls on Thursday, November 26, which gives you a couple of weekends to practice before the real thing.
This list is all about doing it yourself: each design comes with the polish lineup, an honest difficulty rating and a shortcut that saves time.
If you want to see what salons are doing this season too, our roundup of Thanksgiving nail art trends is a fun place to compare.
Do not miss number 4, the pie slice nail you can paint with a triangle and a dot, and number 9, the matte trick that makes drugstore polish look like velvet.
1. Oak leaf decals on nude and chocolate brown

This is the perfect first project if you have never tried nail art at home.
Paint two coats of nude on most nails and chocolate brown on the rest, then wait until they no longer feel tacky.
Slide on orange oak leaf water decals and press each one flat with a damp cotton pad.
A layer of top coat hides the decal edges, so the leaves look hand painted.
Short, rounded nails like these are the easiest to cover, so length is not a concern.
Polish lineup: creamy nude, chocolate brown, top coat and orange leaf decals.
DIY difficulty: Easy, about 40 minutes.
Shortcut that works: Cut the decals apart before you start, so you are not fumbling with wet nails.
2. Patchwork scarecrow nails with caramel plaid

Scarecrow style is having a moment, and this set is easier than it looks.
Over a warm nude, paint little square patches in tan and cream, then add tiny black cross stitches around the edges.
Two nails get caramel and brown plaid lines, and one tip holds a small orange pumpkin.
The stitches do not need to be perfect, because real patchwork is a little wonky too.
On deeper skin tones, the warm nude base and caramel plaid look especially rich.
Polish lineup: warm nude, tan, cream, caramel, black and pumpkin orange.
DIY difficulty: Medium, about 75 minutes.
Shortcut that works: Use a toothpick for the stitches, since it makes cleaner, shorter lines than a brush.
3. Rose gold leaf stickers on soft pink
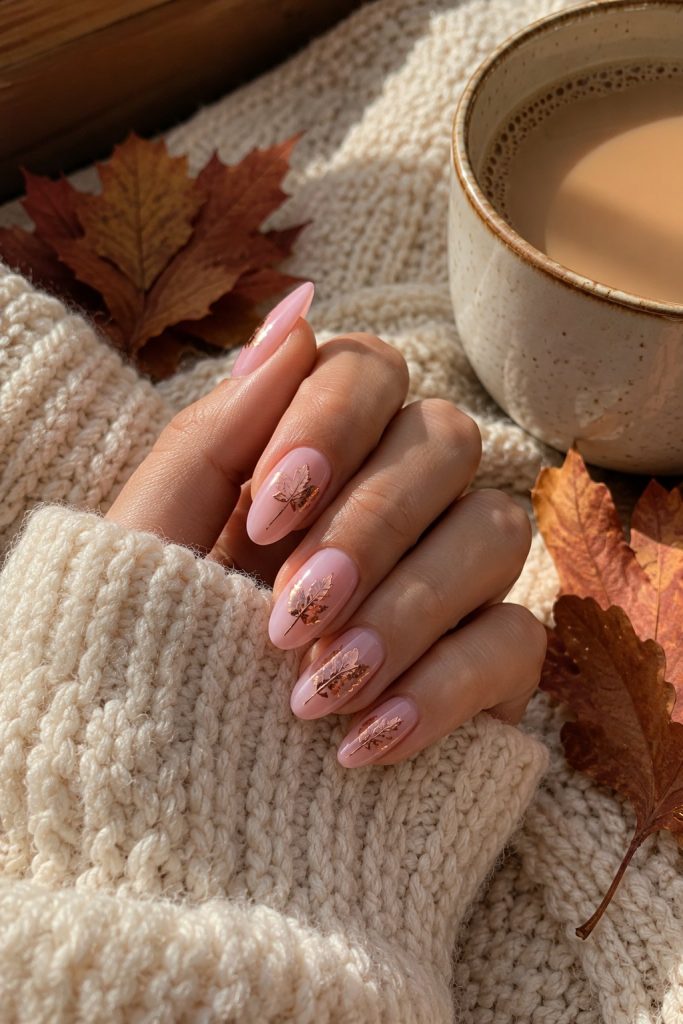
Nail stickers are the secret weapon of every at-home manicure, and this photo even shows the sheet.
Soft pink almond nails get rose gold leaf stickers along the sides and tips, like leaves sweeping in on a breeze.
Lift each sticker with tweezers, press it down from the center out, then file off any overhang at the edge.
Two coats of top coat lock everything in and keep the metallic shine.
It takes about 20 minutes and looks like you spent an afternoon at the salon.
Polish lineup: sheer pink, rose gold leaf stickers and top coat.
DIY difficulty: Very easy.
Shortcut that works: Warm the sticker sheet in your palm for a few seconds so the stickers bend around the curve of the nail.
4. Cranberry, gold glitter and a pumpkin pie slice

Here is the pie slice nail promised in the intro.
Paint most nails cranberry red, then give one finger a full coat of gold glitter.
On an accent nail, paint a white base, add an orange triangle for the slice, a light brown crust line along the top and a dot of white for whipped cream.
Two more nails wear a nude base with simple red petal lines.
Real short nails like these prove you do not need extensions to have fun with your manicure.
Polish lineup: cranberry, gold glitter, white, pumpkin orange, light brown and nude.
DIY difficulty: Medium.
Shortcut that works: Paint the crust in one confident stroke with a striping brush, then dot the cream with the end of a bobby pin.
5. Bold orange and black stripes with a shimmer stripe
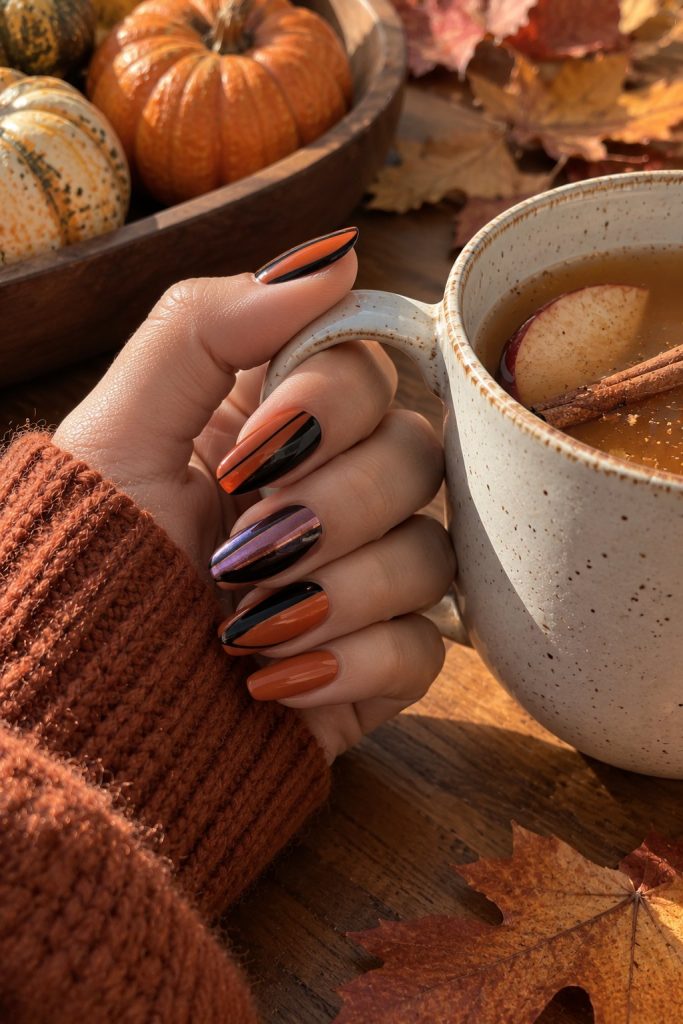
Stripes are one of the most forgiving designs to try at home, because striping tape does the hard work for you.
Paint the nails black, let them dry fully, then lay thin tape strips across and fill the gaps with bright orange.
One nail swaps the orange for a purple shimmer as a little surprise.
The photo shows a web accent on one finger, so for the holiday table, trade it for a small gold leaf instead.
Peel the tape slowly while the polish is still slightly soft to get crisp lines.
Polish lineup: black, bright orange, purple shimmer and striping tape.
DIY difficulty: Easy to medium.
Shortcut that works: Press the tape onto your jeans once before using it, so it is less sticky and will not lift the base color.
6. Caramel and chocolate marble with gold foil

Marble looks fancy, but it is really just controlled messiness.
On square nails, dab caramel, chocolate brown and cream over a wet clear coat, then drag the colors together with a thin brush.
While it is still tacky, press small pieces of gold foil along the swirl lines.
Every nail comes out a little different, which is exactly the point.
Finish with a thick top coat for that glassy, liquid look.
Polish lineup: caramel, chocolate brown, cream, gold foil and clear coat.
DIY difficulty: Medium, about one hour.
Shortcut that works: Dab crumpled plastic wrap over the wet colors for a marble effect in seconds.
7. Rust and burgundy with a 3D flower and pearls
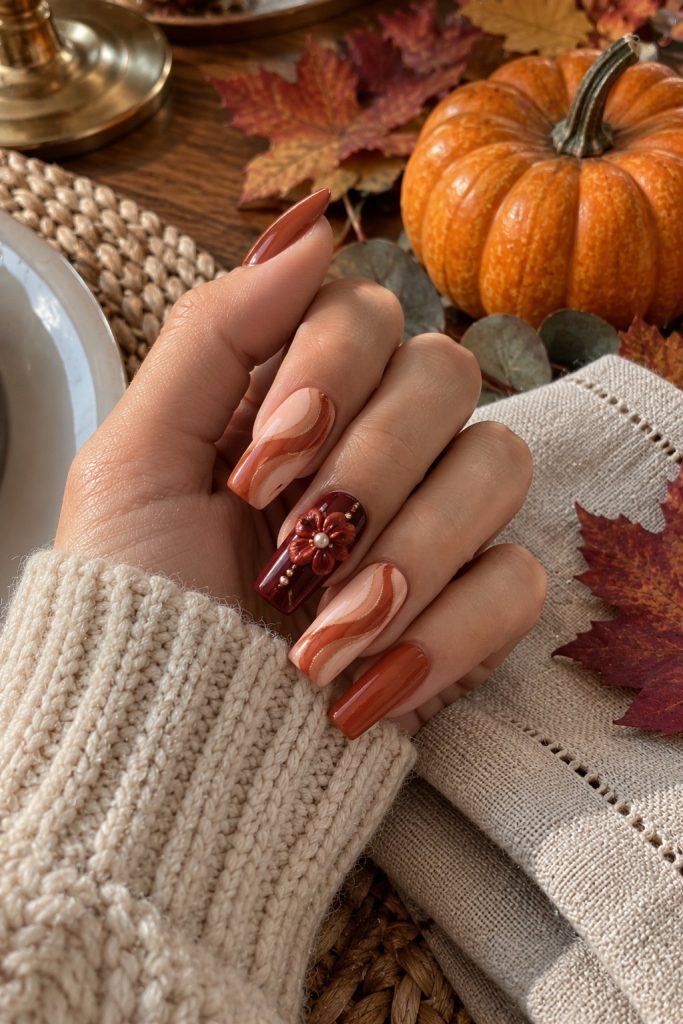
Want a showstopper you can still build at your kitchen table?
This set mixes peachy terracotta swirls with a glossy burgundy nail and one accent with a raised red flower and a gold center.
Tiny pearls sit near the base of a few nails for a vintage touch.
The flower can be a ready-made 3D charm, so you do not need any sculpting skills.
Stick to one charm per hand so the whole design stays elegant.
Polish lineup: peach, terracotta, burgundy, nail glue, small pearls and a flower charm.
DIY difficulty: Medium to advanced.
Shortcut that works: Attach charms with a dab of builder gel or nail glue, then seal around them with top coat.
8. Mocha French with white stripes and a gold line

Sometimes the most polished look is the simplest one.
Short square nails in soft mocha get two or three thin white stripes across the tip, with a single gold line on a few nails.
It is a modern twist on the French manicure that goes with every outfit you own.
Use a striping brush or nail art tape and work from the free edge back toward the cuticle.
Pick this one if you need nails that stay neat through a full day of cooking.
Polish lineup: mocha or taupe crème, white and gold striping tape.
DIY difficulty: Easy.
Shortcut that works: Gold striping tape gives a perfect metallic line without any paint at all.
9. Matte orange with copper glitter and a pumpkin

As promised, here is the matte trick.
Paint a glossy bright orange, then add a matte top coat and watch an everyday polish turn soft and velvety.
Two nails get chunky copper glitter, and one nude accent nail carries a little pumpkin outline with tiny orange stars around it.
Matte next to sparkle creates contrast with zero extra effort.
It is bold, fun and very easy to repeat on your second hand.
Polish lineup: bright orange, copper glitter, nude, black liner and matte top coat.
DIY difficulty: Easy to medium.
Shortcut that works: Use star shaped nail sequins instead of painting stars, pressed in while the top coat is wet.
10. Blush plaid in black, white and red

End the list with a plaid that looks complicated but follows a simple pattern.
Over a blush pink base, paint wide white lines, then thin black lines on top and a single red line through each square.
A few nails swap full plaid for a diagonal tip, which keeps the set from feeling heavy.
Work on one nail at a time so the lines blend nicely where they cross.
It looks beautiful with a camel coat on the drive to dinner.
Polish lineup: blush pink, white, black and red.
DIY difficulty: Medium to advanced.
Shortcut that works: Plaid water decals give the same look in a fraction of the time.
A simple five step routine
- Gently push back cuticles and file every nail into the same shape.
- Wipe each nail with remover so the polish grips well.
- Apply base coat and two thin color coats, letting each one set for two minutes.
- Add your art, decals, stickers or foil.
- Seal with top coat and wrap it over the tip of each nail.
Your at-home Thanksgiving nail kit
- A base coat and a glossy top coat, plus a matte top coat for number 9.
- A dotting tool set, or a bobby pin and a toothpick in a pinch.
- A fine striping brush and a roll of striping tape.
- Water decals or leaf stickers for quick designs.
- Foil gel and gold foil for shiny accents.
- A small brush dipped in remover for clean edges.
- Plan your hair the same evening: these simple Thanksgiving hairstyles take about as long as a top coat takes to dry.
- Lay out your look with these Thanksgiving outfit ideas for Black women so your shades match.
Frequently asked questions
Do I need a UV lamp for these designs?
No. Every set here works with regular polish, and only the flower charm in number 7 is easier with builder gel and a lamp.
How do I fix a smudge before the top coat?
Dip a fingertip in remover, tap the smudge lightly to smooth it, then add one thin coat of color.
What is the easiest design for a beginner?
Start with the rose gold stickers in number 3 or the mocha stripes in number 8.
How long should polish dry before dinner?
Give it at least an hour, and use a quick dry top coat if you are cutting it close.
Can stickers go over regular polish?
Yes, as long as the polish is completely dry. Seal them with top coat so the edges stay down.
Your kitchen table salon is open
You do not need a salon booking to show up with Thanksgiving nails you love.
Pick one design, set aside an evening the weekend before November 26 and put on a cozy playlist.
Then turn your attention to the rest of the day with these easy Thanksgiving hosting ideas.
Related Post